Connect your SeoToaster site Connect your WordPress site
SeoSamba Point of Sale (POS)

SeoSamba POS Mobile — Your Store in Your Pocket

Setup and Logging In

The SeoSamba Point of Sale (POS) application (Apple and Android ) streamlines retail operations by integrating sales, inventory management, and customer tracking. Follow these steps to set up your system:

  1. Create or connect to your store
  2. Get an account with Stripe
  3. Download and Install the App
    • Get the SeoSamba POS app from the App Store on your Android or iPhone device.
  4. Log in to the System
  5. Select Your Store and Checkout Lane
    • Choose your store location to synchronize sales and inventory data across connected locations, including online stores.
    • Open a checkout lane to begin processing transactions. You will find financial and POS activity logs in the report section of your web stores' dashboard.  

Key Features

  • Inventory Management: Track local and overall stock levels, allowing sales of out-of-stock items directly from your mobile device.
  • Customer Accounts & CRM: Access comprehensive customer records and sales history through the web-based CRM.
  • Flexible Transactions: Use the quick sale feature for simple transactions or a cash register for managing multiple items.


Adding & Syncing Products Across Stores and Online

Keeping your product catalog updated is simple with SeoSamba POS. Any additions or modifications made in the app are automatically synced with your website, ensuring consistent product availability across all sales channels. Thanks to automatically created product lists on website, any new product added and tagged via the POS app will appear instantly within the webstore long with similarly tagged products.      

How to Add or Edit a Product

  1. Edit an Existing Product

    • Navigate to the product list, search for the item, tap to edit, and update the details.
  2. Add a New Product

    • Tap the “+” button.
    • Upload a product photo using your phone's camera or library.
    • Enter the product name, brand, tags, and condition.
    • Use the AI-powered description generator or manually input a description.
    • Add product identifiers (MPN, SKU, GTIN) manually or via barcode scanner.
    • Specify quantity, price, tax rate, and any additional measurements.
    • Save your changes to sync across all locations.

Additional Online Features

  • Add supplementary images, videos, and text to online listings. For this just go to the edit product screen or product landing page. 
  • SeoToaster created XML feeds for each tag in your webstore as well as general ones which conform to Google Shopping standard, These feeds can be used for advertising, remarketing campaigns or in your SeoSamba marketing OS social curation tb to easily animate your store.

Cash Register & Multi-Store Management

SeoSamba POS offers a fully integrated cash register with modern online features, allowing seamless in-store and online transactions.

Getting Started

  1. Start a Transaction

    • Tap “Start” at the top right corner.
    • Choose between barcode scanning or manual product lookup.
  2. Barcode Scanning

    • Use your phone’s camera to scan product barcodes continuously.
    • If an item isn’t found, the system will notify you.
  3. Product Lookup

    • Search by name, filter by tags, or sort by price.
    • Show out-of-stock items or check availability across locations.

Checkout Process

  • Search for the Customer’s Account: Optional but enables shipping options.
  • Select Pickup or Shipping:
    • "Take Away" for in-store pickup.
    • Ship items based on customer preference.
  • Multi-Store Fulfillment: Customers purchasing items from different locations will receive a pickup slip or have the order shipped accordingly.

Payment Methods

  • Wireless card reader
  • Tap-to-pay via phone
  • Manual entry or scanning of card details
  • Cash payments with automated change calculation

Final Steps

  • Print or email receipts.
  • Include a review request link for platforms like Google or Facebook.

Quick Sale Transactions

The Quick Sale feature is ideal for fast, on-the-go transactions, making it perfect for mobile merchants and service providers.

How to Use Quick Sale

  1. Enter the Item Price
  2. Select Payment Method:
    • Contactless tap-to-pay
    • Chip-and-pin card reader
    • Manual entry or scanning of card details
    • Cash payments
  3. Add Optional Details
    • Attach a photo and description to the transaction for records.
  4. Finalize the Sale
    • Email a receipt.
    • Send a review request link via text or email for over 100 platforms, including Google and Facebook.

Security Note: All transactions are securely logged, but customer card details are never stored.


Second Screen - customer-facing display for your POS

Second Screen adds a second tablet to your checkout counter, facing the customer instead of your staff. While your salesperson rings up the sale on the main POS screen, the customer sees their own live view on the tablet next to them.

From the salesperson's side

To connect the customer-facing tablet, you use a pairing code. This code is generated automatically and refreshes each time you log into your POS app, so it is always tied to your current session. You will find it in your POS app.
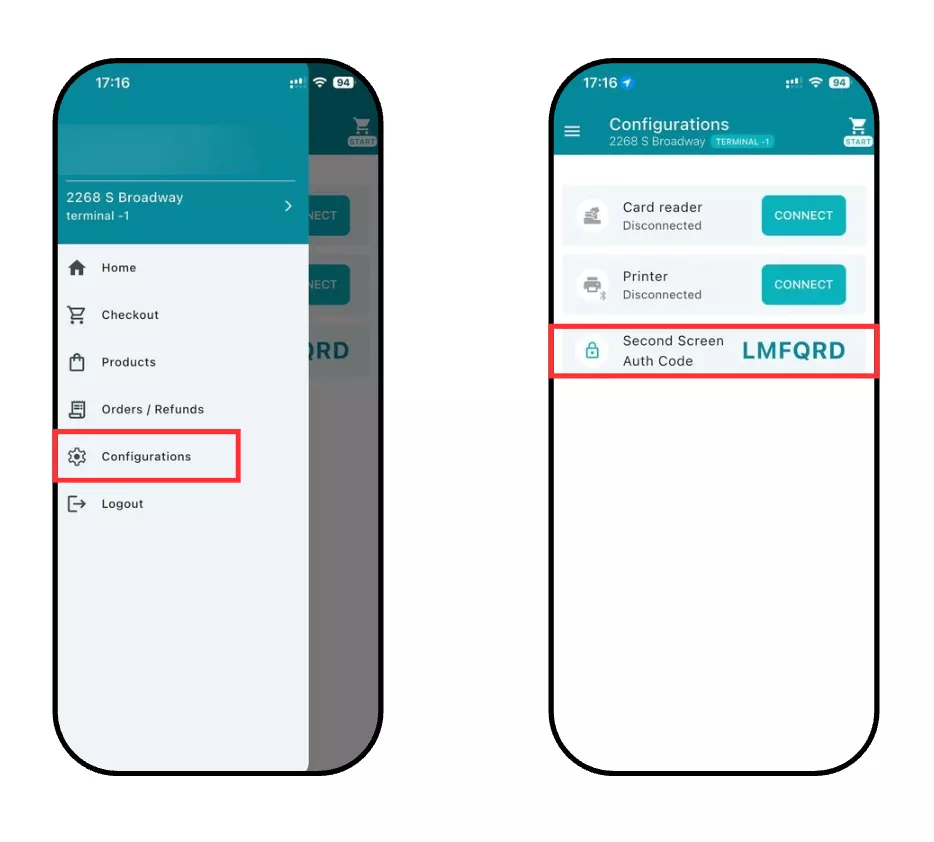
code to connect second screen pos.webp

Using your phone or tablet POS app, you choose which terminal and sales account the customer tablet connects to, add products to the cart, enter shipping information if needed, and choose the payment method, just like a normal sale. If the customer has shopped with you before, their account is recognized through this connection as well. As soon as the customer adds a tip, you'll see the checkout total on your screen update automatically.

From the customer's side

As items get added to the cart, they watch the list build in real time and see the running total update. Before paying, they can:
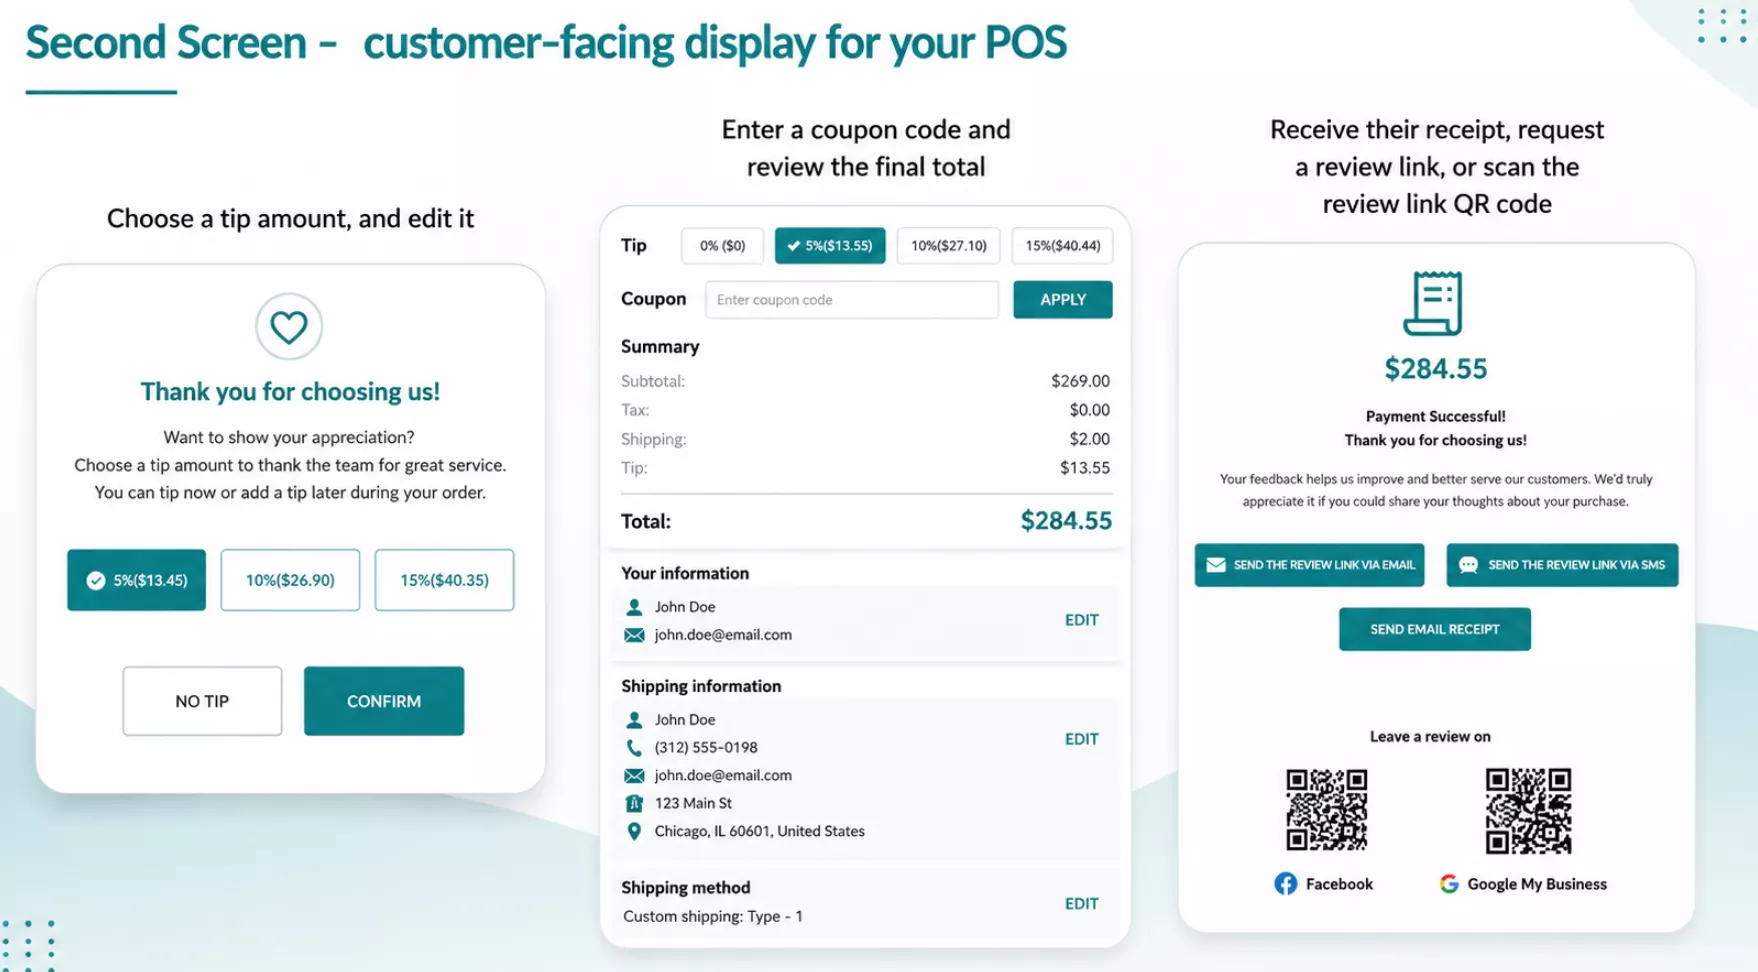
  • Enter a coupon code
  • Choose a tip amount, and edit it
  • Review the final total

customer facing display.webp

Once the purchase is complete, the customer can choose to have their receipt sent straight to their email instead of getting a paper copy, and they can have a review link sent to themselves as well, so they can leave feedback later.

They can also scan a QR code that leads to the same review system from their own phone.

The review link, however the customer reaches it, first goes to a private feedback step you control, not straight to a public page. If a customer had a bad experience, they can tell you directly, and you get the chance to fix it before it ever reaches Facebook or Google Business reviews. If the experience was good, the review goes public as normal.
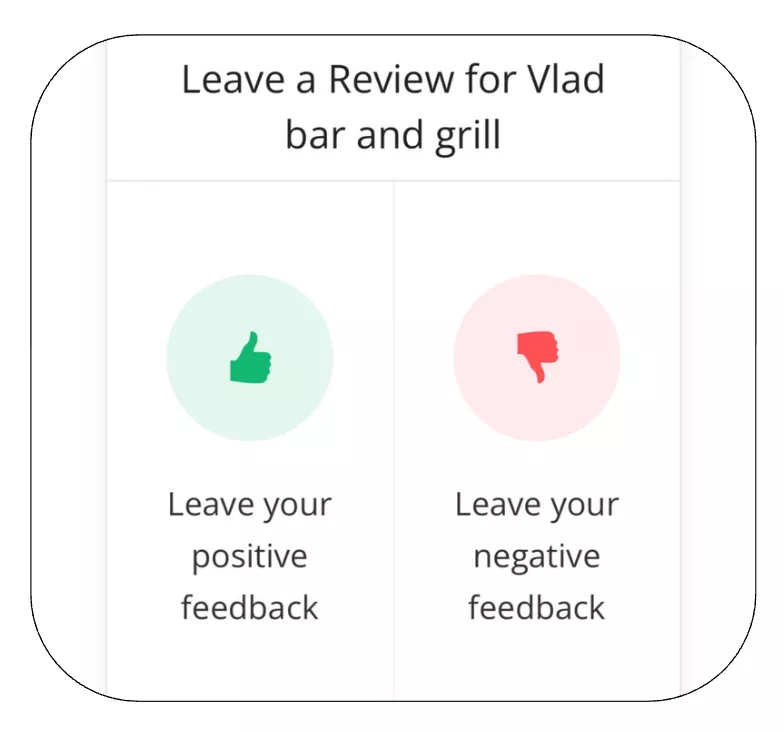
leave a review system.webp

Second Screen turns on automatically the moment you connect your POS, so there is no separate setup step. The default tip options are 5%, 10%, and 15%, but you can set your own percentages in your POS tip settings, or turn the tip prompt off entirely by clicking Disable Tip Pop-up.

To enter POS tips config, please log in to your seotoaster website with your credentials, go to the menu on the right and find SEOSAMBA POS, click “POS tips config” and edit information or “Disable tip pop-up”.
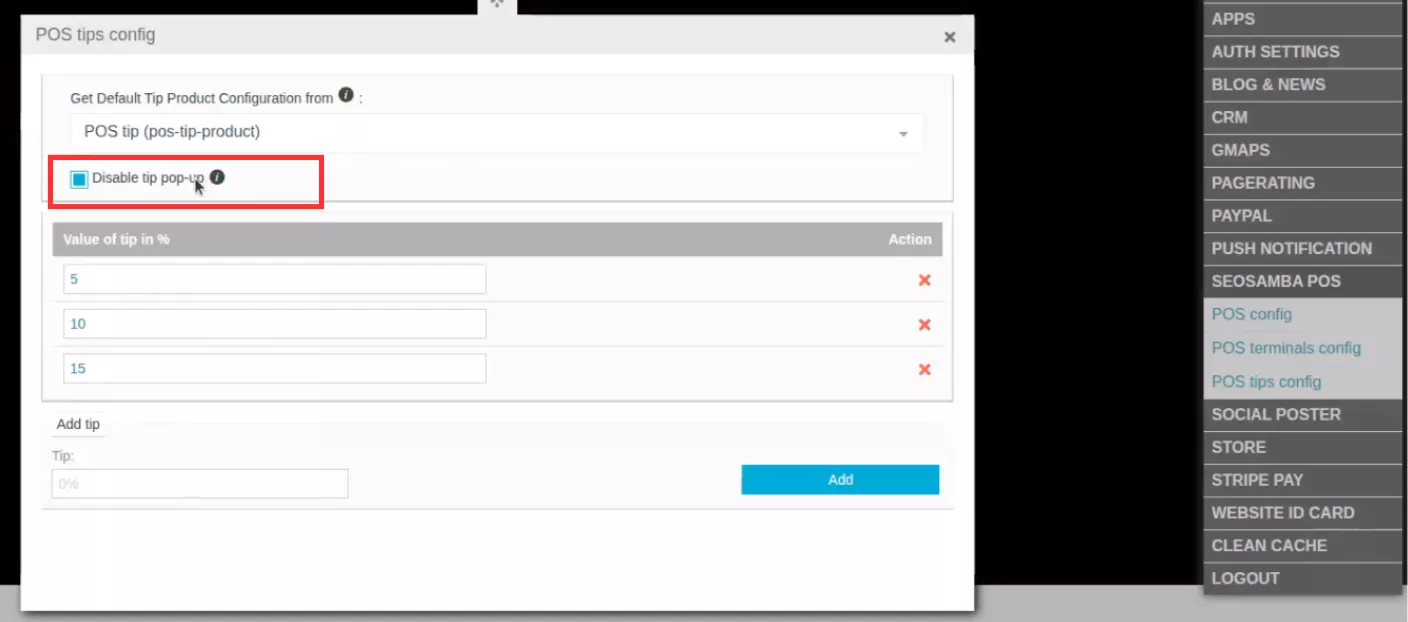

disable tip pop up.webp

Download our Social Media and CRM Mobile Apps for your Iphone Download our Social Media and CRM Mobile Apps for your Android Phone Sign Up Login